Overview
This article details the steps involved to connect Jet Analytics to the following data sources:
| Business Central Version 16 or Later (Online Tenant) | |
|---|---|
|
Business Central (Online Tenant) via OAuth Recommended Cloud Connection The Jet Data Manager can connect to Business Central via Online Tenant using a locally stored OAuth token to authenticate the connection. |
Business Central (Online Tenant) via Web Services Key (To be Deprecated by Microsoft in 2022) Not a recommended method as the Web Services Key is planned to be deprecated as a method of authentication by Microsoft sometime in 2022. |
| Business Central Version 16 or Later (On Premise) | |
|---|---|
|
Business Central (On-Premise) via Web Service Connection This is the most complete method of connecting to an on-premise instance of Business Central. This connection method will pick up ENUM's and automatically consolidate aggregation tables.
|
Business Central (On-Premise) via Direct SQL Connection This method is the fastest for On-Premise connections but comes with drawbacks. The Direct SQL Connection will not pick up ENUM's and will not consolidate aggregation tables. If the performance of a connection via Web-Services is not viable, customizations can be made in your project to achieve the same results. |
Business Central (Online Tenant)
Step 1: Gather tenant and environment information
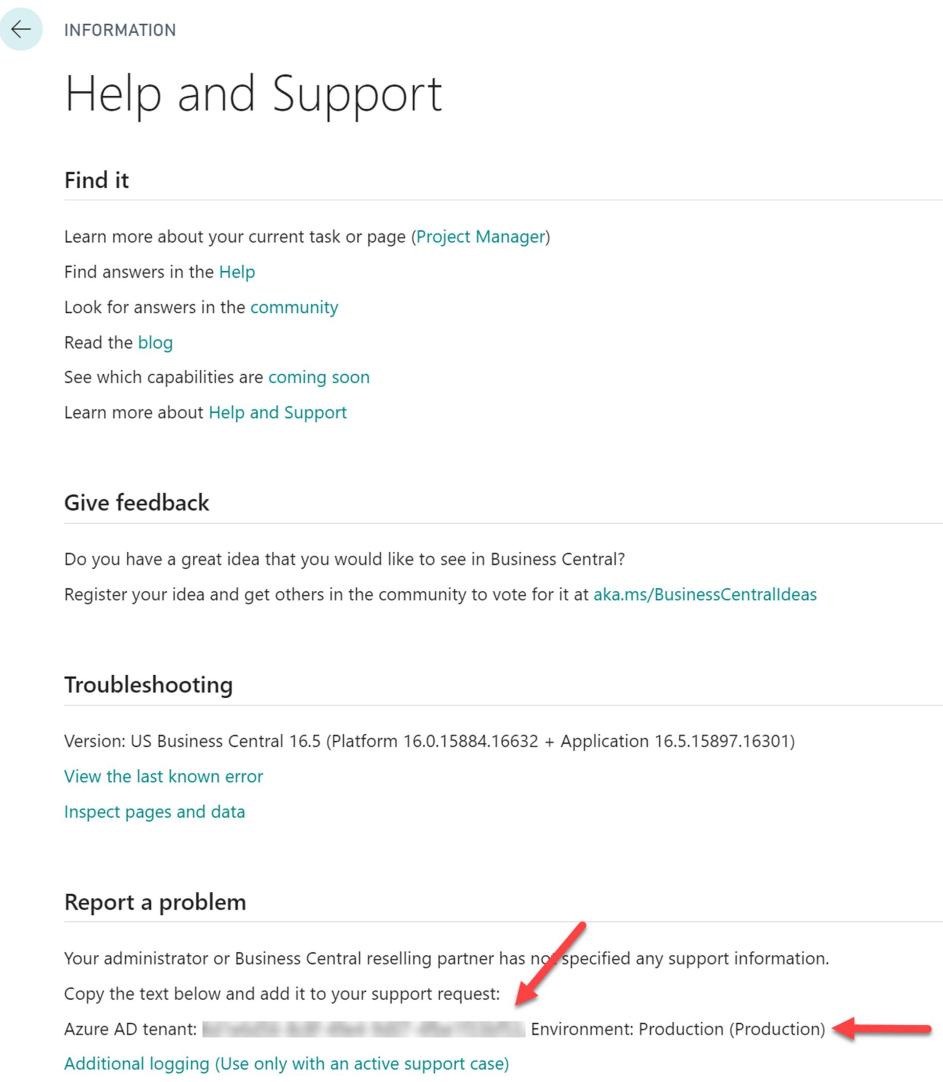
From the Business Central portal navigate to Help and Support.
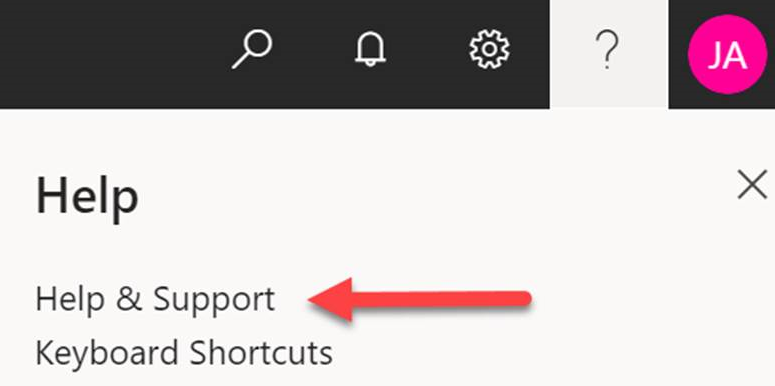
Locate your Tenant ID and Environment name.
Step 2: Obtain web services access key
From the search icon navigate to Users
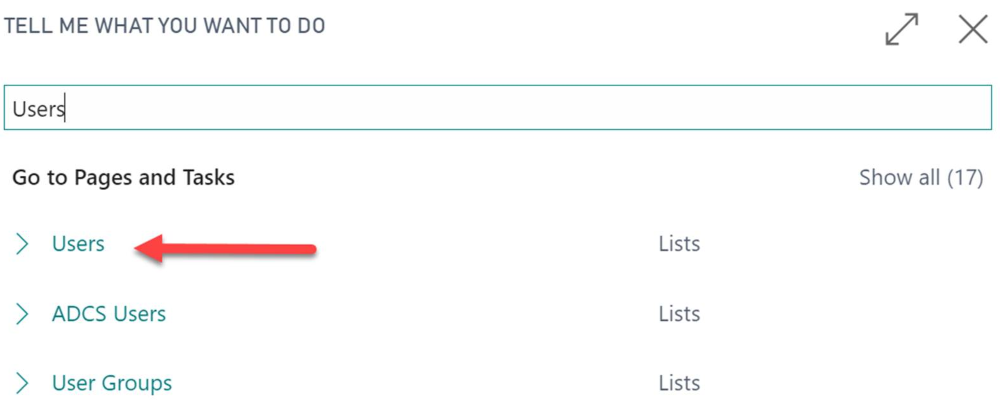
Select the user which will be used to establish the connection to the Business Central data source.
Note: this user will require a permission set of SUPER and the company column should be blank.
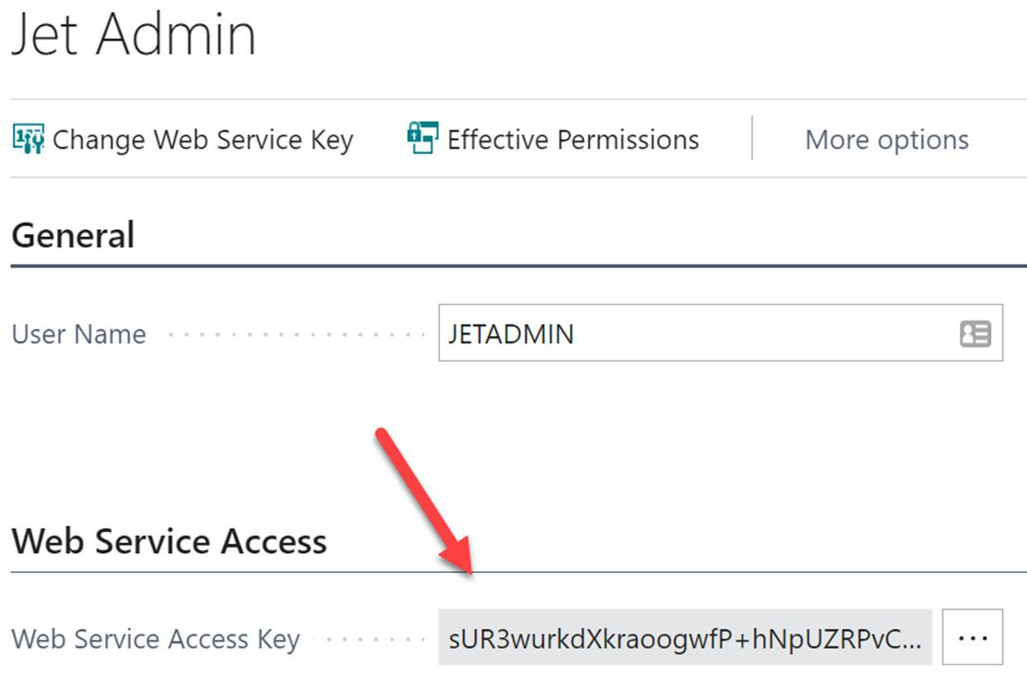
Next copy the Web Services Access Key
Step 3: Install Extension
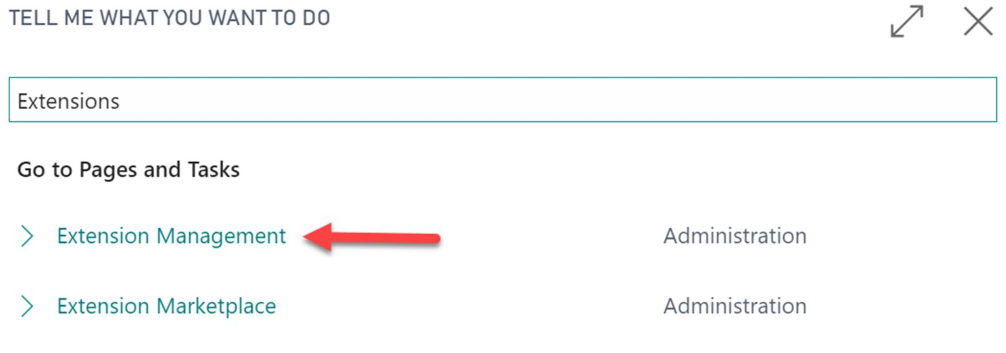
From within the Business Central portal, using the search icon, navigate to Extension Management
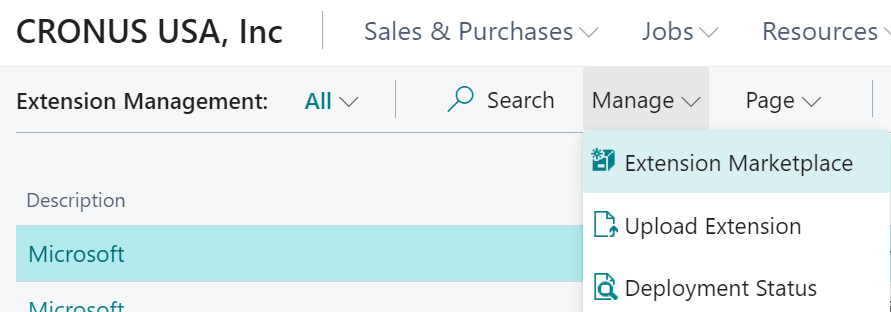
click Manage → Extension Marketplace
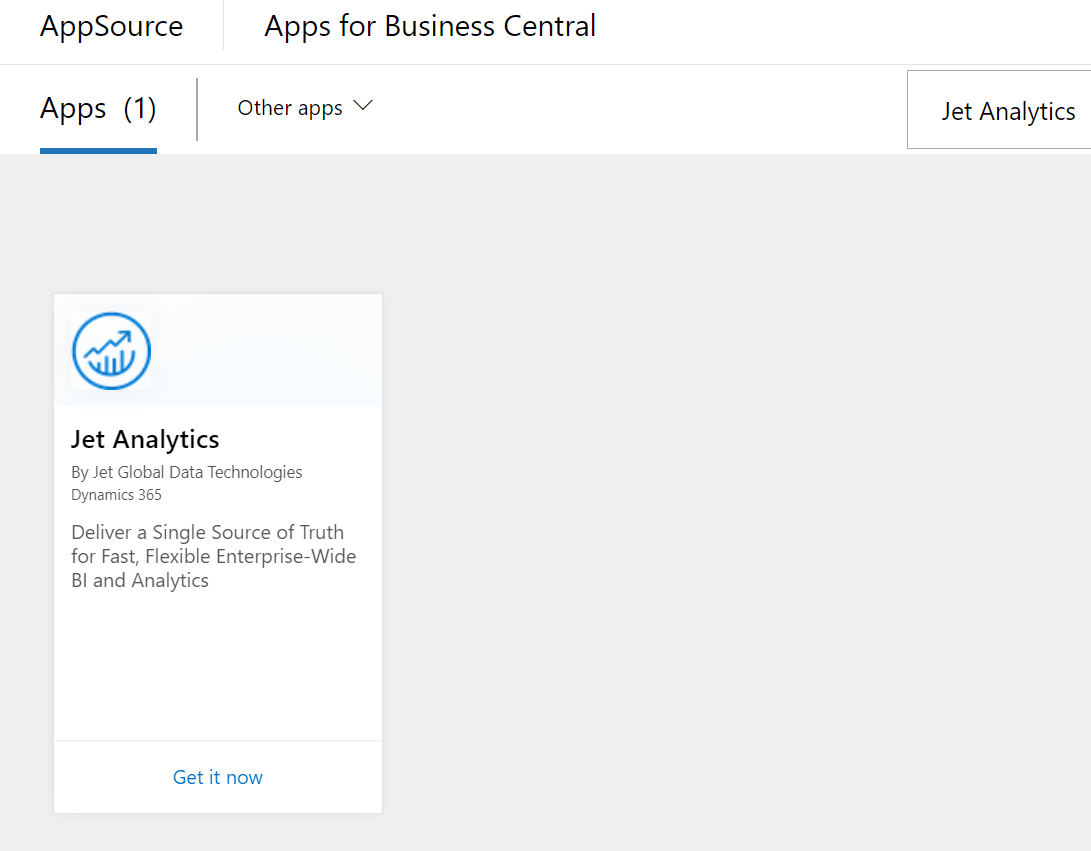
Search for "Jet Analytics" and click Get it now.
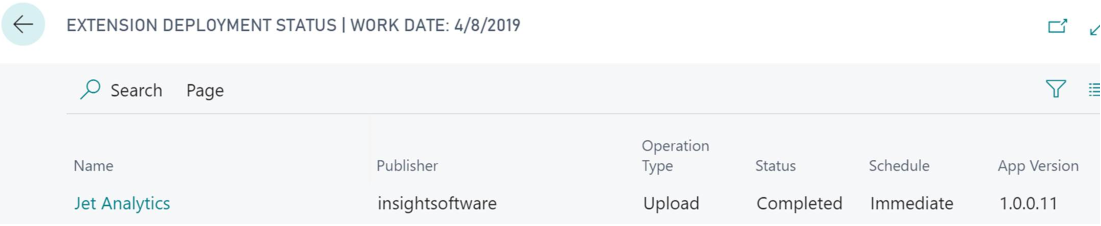
Step 4: Verify extension installation
Click Manage and then Deployment Status
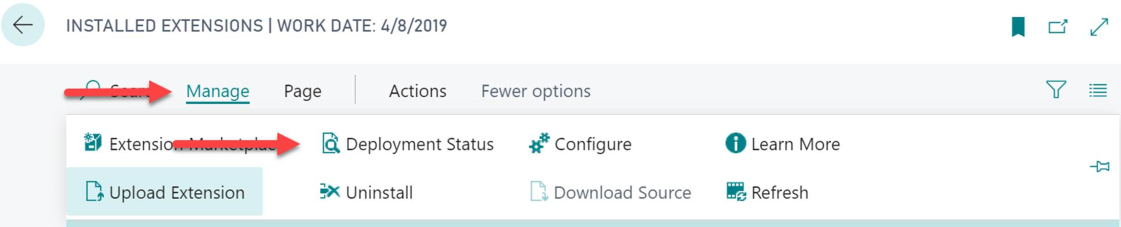
Verify that the status column has a value of completed.
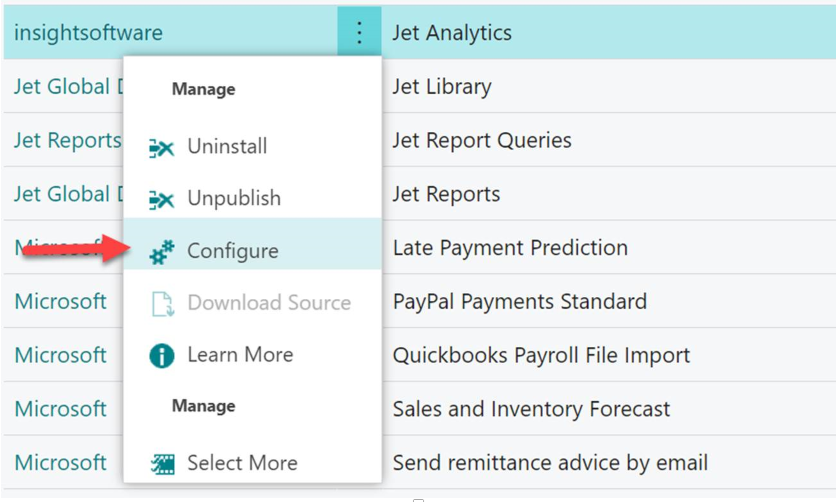
Step 5: Allow http client requests
Note: if you are configuring a Production environment you can skip this step
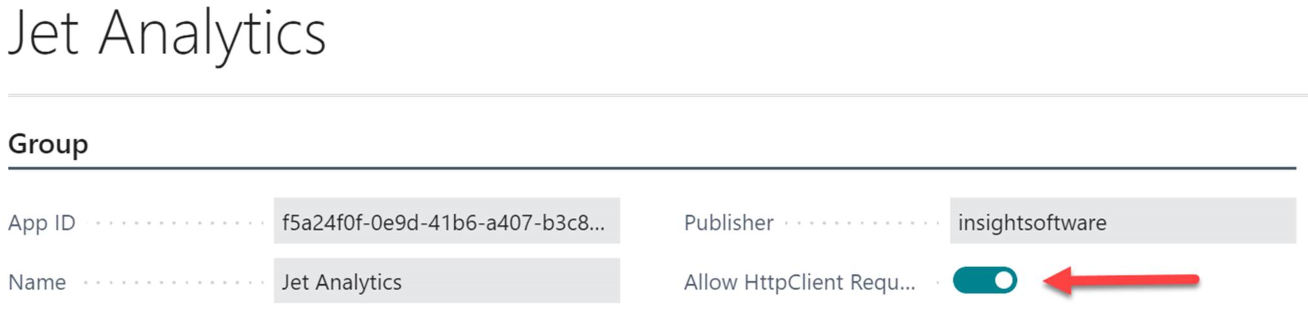
If you are configuring a Sandbox environment, you will need to allow the Jet Analytics extension to send diagnostic information. In the Business Central portal, navigate to Extension Management. Locate the Jet Analytics extension, and click on the menu next to the extension name (indicated by three vertical dots). Click Configure and toggle on Allow HttpClient Requests.
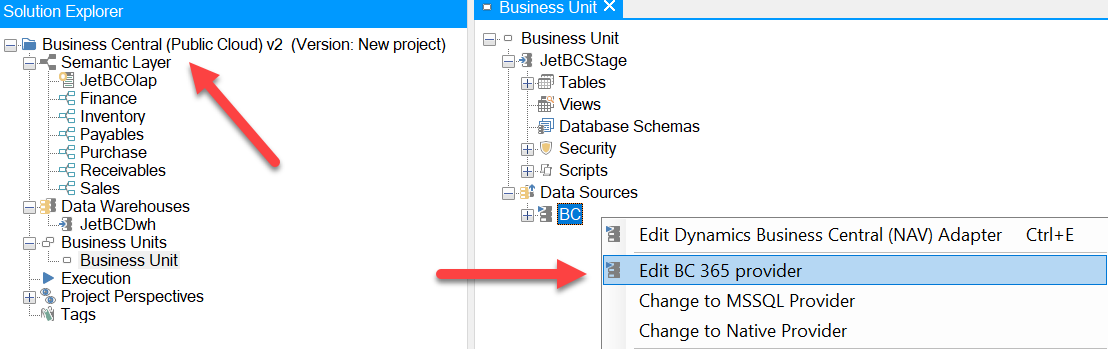
Step 6: Configure Business Central data source in Jet Analytics project
Open your existing project. In this example, we are using a pre-build cube store project.
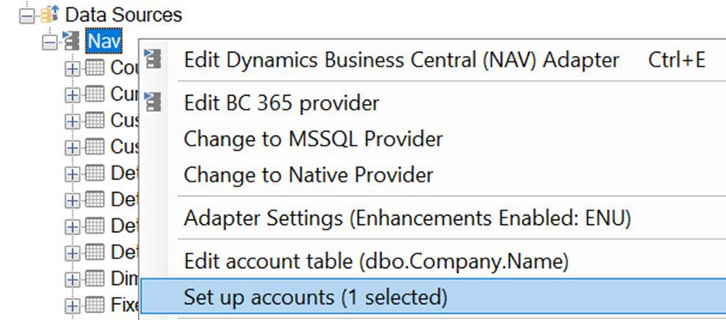
Right click on the data source and choose Edit BC 365 provider
Input the following:
- API URL
- Environment name
- NOTE: if your environment is not named 'Sandbox' or 'Production', you will need to click in this box and type out the environment name.
- Authentication type
- Username
- Password
Once done click Test Connection → OK.
Note: the username will be in the same format as the username in the Business Central portal. Do not use the UPN / email address.
Note: the password will be the web services access key.
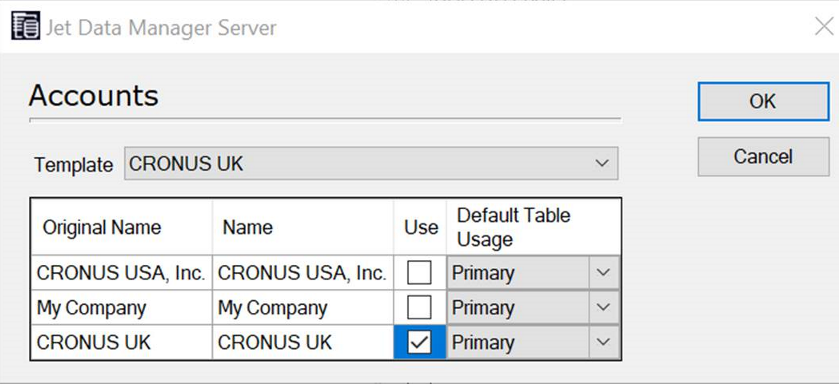
Next, right click on the data source and choose Set Up Accounts
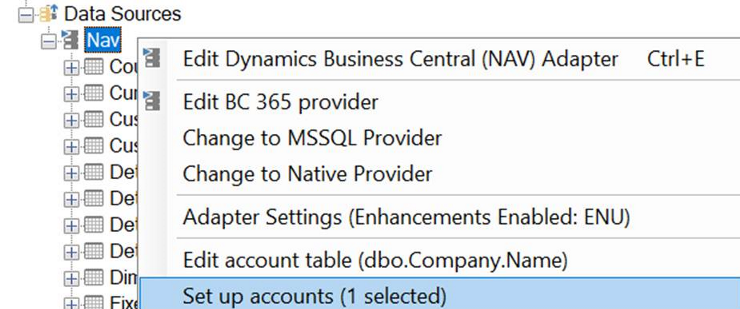
Check the box for the desired companies and click OK.
Next, right click on the data source and choose Synchronize Objects.
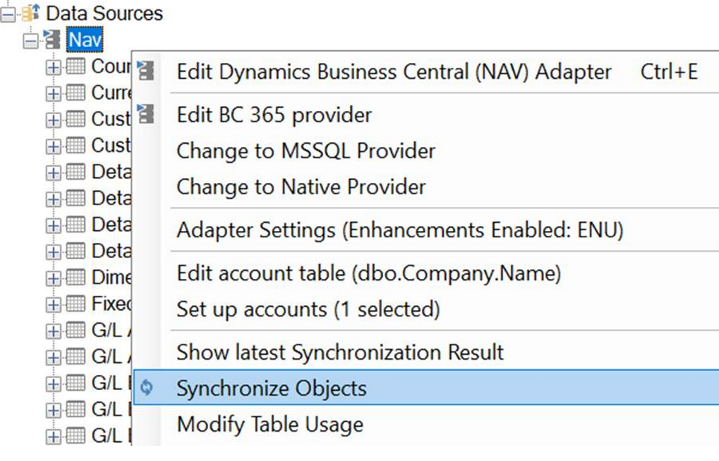
You should now be able to see your tables in the Data Selection pane.
Business Central (Online Tenant) via OAuth
Step 1: Gather tenant and environment information
From the Business Central portal navigate to Help and Support.
Locate your Tenant ID and Environment name.
Step 2: From the search icon navigate to Users
Select the user which will be used to establish the connection to the Business Central data source.
Note: this user will require a permission set of SUPER and the company column should be blank.
Step 3: Install Extension
From within the Business Central portal, using the search icon, navigate to Extension Management
click Manage → Extension Marketplace
Search for "Jet Analytics" and click Get it now.
Step 4: Verify extension installation
Click Manage and then Deployment Status
Verify that the status column has a value of completed.
Step 5: Allow http client requests
Note: if you are configuring a Production environment you can skip this step
If you are configuring a Sandbox environment, you will need to allow the Jet Analytics extension to send diagnostic information. In the Business Central portal, navigate to Extension Management. Locate the Jet Analytics extension, and click on the menu next to the extension name (indicated by three vertical dots). Click Configure and toggle on Allow HttpClient Requests.
Step 6: Configure Business Central data source in Jet Analytics project
Open your existing project. In this example, we are using a pre-build cube store project.
Right click on the data source and choose Edit BC 365 provider
Input the following:
- API URL
- Environment name
- NOTE: if your environment is not named 'Sandbox' or 'Production', you will need to click in this box and type out the environment name.
- Authentication type
To authenticate with OAuth, you will need to specify a path in which to create a token on your local machine. The path can be anywhere on the local machine and can have any name as long as it ends in ".txt".
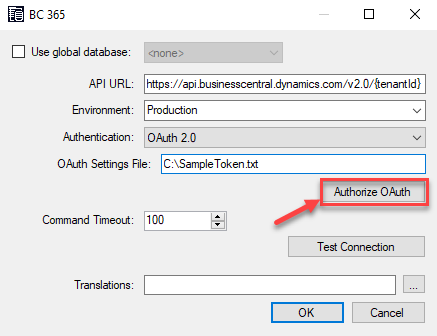
After entering the token path, click Authorize OAuth and the token will automatically be created in the specified path after entering your Business Central login credentials.
Once done click Test Connection → OK.
Note: the username will be in the same format as the username in the Business Central portal. Do not use the UPN / email address.
Next, right click on the data source and choose Set Up Accounts
Check the box for the desired companies and click OK.
Next, right click on the data source and choose Synchronize Objects.
You should now be able to see your tables in the Data Selection pane.
Business Central (On-Premise) via Direct SQL Connection
Note: as of 1/15/2021 the direct SQL Connection does not support ENUM objects. If you need these ENUM objects you should use the Business Central (On-Premise via Web Service Connection).
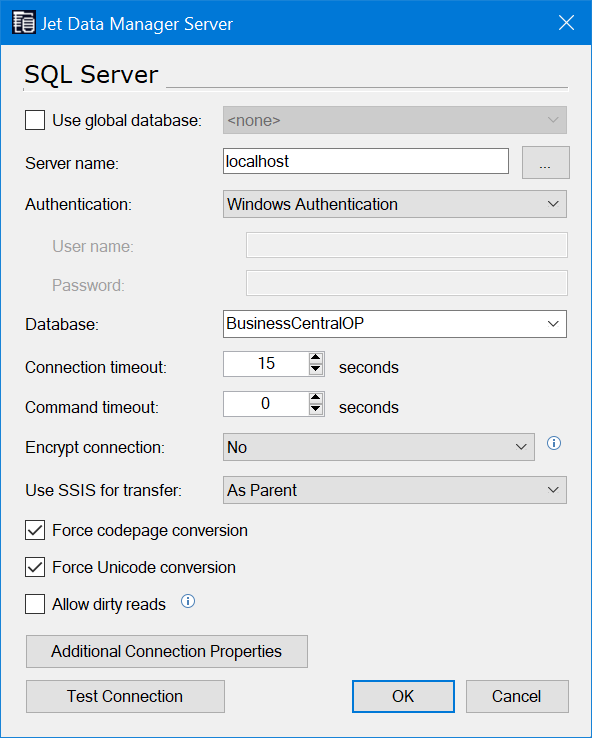
Step 1: Right click on the data source and choose "Edit Microsoft SQL Provider"

Step 2: Enter the server name where the BC database resides and select the database in the drop-down list.
Step 3: Right click on the data source and choose "Set up accounts"
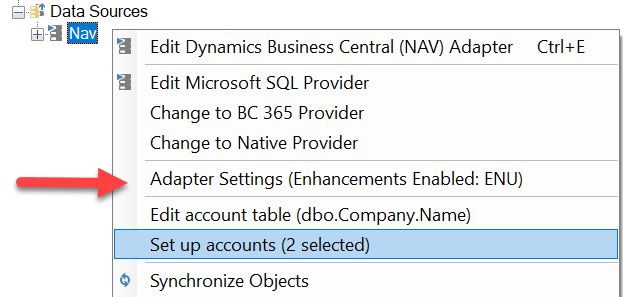
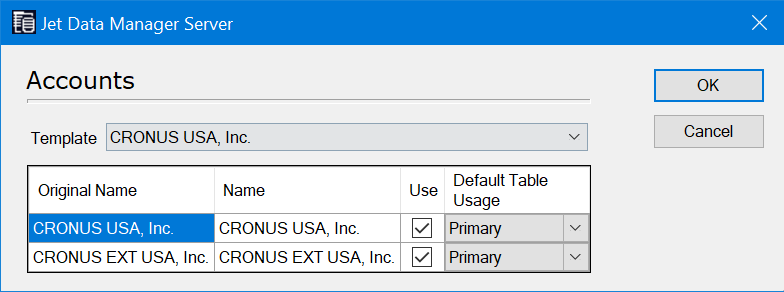
Check the box to indicate which company data sets to pull into the project. In this example, we want to pull data for both CRONUS USA and CRONUS EXT USA
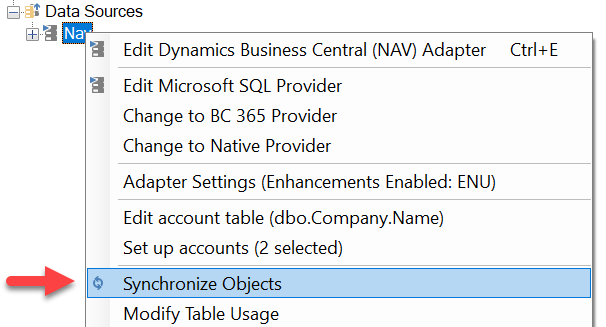
Step 4: Right click on the data source and choose "Synchronize Objects"
Business Central (On-Premise) via Web Service Connection
Step 1: Select the .app file from the download here that corresponds with your version of Business Central
Step 2: Publish the application
Run the following cmdlet in the Business Central Administration Shell:
Publish-NAVApp -ServerInstance [ServerInstance] -Path [PathToAppFile] -SkipVerification

Publish-NAVApp -ServerInstance 'MicrosoftDynamicsNavServer$BC160' -Path 'C:\JetAnalyticsCloudConnector\JetAnalyticsCloudConnector\insightsoftware_Jet Analytics_1.0.0.20.app' -SkipVerification
Step 3: Synchronize
Run the following cmdlet in the Business Central Administration Shell:
Sync-NAVApp -ServerInstance [ServerInstance] -Name [AppName] -Version [AppVersion] -Tenant [TenantName]

Sync-NAVApp -ServerInstance 'MicrosoftDynamicsNavServer$BC160' -Name 'Jet Analytics' -Version 1.0.0.20 -Tenant default
Step 4: Install app
Run the following cmdlet in the Business Central Administration Shell:
Install-NAVApp -ServerInstance [ServerInstance ] -Name [AppName] -Tenant [TenantName]

Install-NAVApp -ServerInstance 'MicrosoftDynamicsNavServer$BC160' -Name 'Jet Analytics' -Tenant default
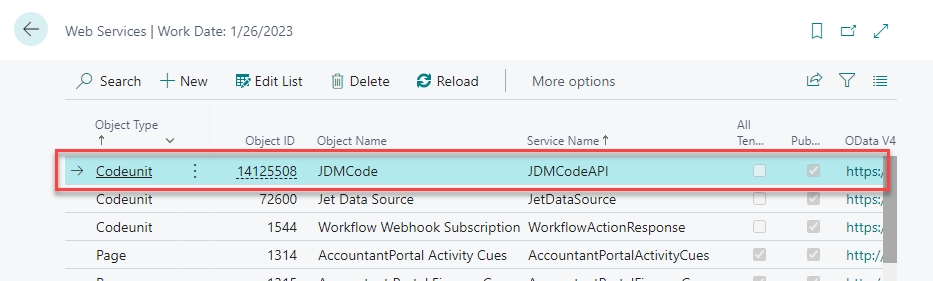
This codeunit will appear in your Web Services
Step 5: Configure Business Central data source in Jet Analytics project
Open your existing project. In this example, we are using a pre-build cube store project.
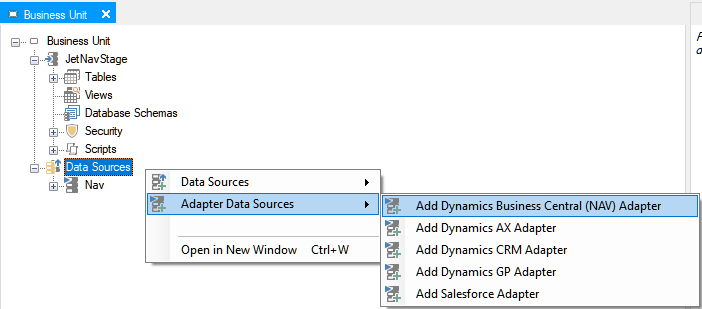
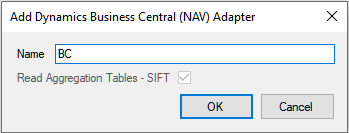
Right click on Data Sources and choose Add Dynamics Business Central (NAV) Adapter
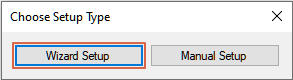
Choose Wizard Setup
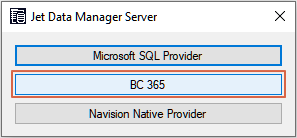
Choose BC 365
Give your data source a name and click OK
Input the following:
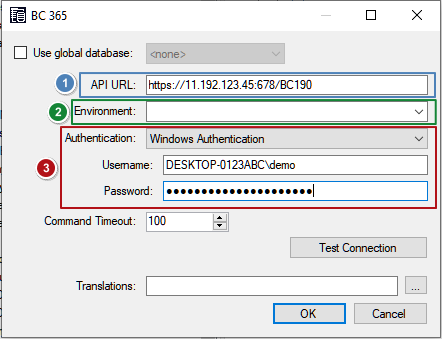
- ODATA API URL
- The API URL should not have a trailing forward slash
- Example URLs:
- https://11.192.123.45:7048/BC190
- https://businesscentral.company.com:7048/Production
- If SSL is not enabled, use http rather than https
- Environment name
- The environment name should be empty
- Authentication type
- This option will depend on your environment
Once done, click Test Connection → OK.
Next, right click on the data source and choose Set Up Accounts
Check the box for the desired companies and click OK.

Next, right click on the data source and choose Synchronize Objects.

You should now be able to see your tables in the Data Selection pane.
Comments